Mardi Gras is loud, colorful, joyful and your nails should be no exception. If you’ve ever scrolled through elaborate nail art and thought that looks amazing, but not realistic for me, you’re not alone. The good news? Easy DIY Mardi Gras nail designs at home are completely achievable, even if you’ve never touched a striping brush in your life.
You don’t need a salon appointment.
You don’t need expensive tools.
And you definitely don’t need perfection.
What you do need is a smart approach, a few intentional color choices, and designs that work with your real-life schedule. I’ve tested these ideas at my own kitchen table between emails, coffee refills, and last-minute plans and they hold up. They look festive without being overworked. And most importantly, they’re actually fun to do.
Why Mardi Gras Nails Are Perfect for DIY
Mardi Gras nail designs are forgiving by nature. The holiday celebrates boldness, contrast, and creativity. That works in your favor.
When colors are meant to pop, tiny imperfections fade into the background. A slightly uneven stripe? It reads as playful. A dot that isn’t perfectly round? Still festive. This is why easy DIY Mardi Gras nail designs at home are ideal for beginners and non-perfectionists alike.
There’s also flexibility. You can go all-in with color or keep things subtle. You can do one accent nail or ten. You can finish in ten minutes or take your time.
It’s your call.
Classic Mardi Gras Colors and Why They Work
Traditional Mardi Gras colors are not random. They carry meaning, and that meaning shapes how designs feel visually.
- Purple reflects creativity, individuality, and richness
- Green brings freshness, balance, and energy
- Gold signals celebration, warmth, and movement
Color theory matters more than technique here. In visual communication, semiotics explains how colors and symbols transmit shared meaning. That’s why even the simplest color placement instantly reads as “Mardi Gras” when these hues are used intentionally.
You don’t need all three colors on every nail. In fact, restraint often looks more refined.
Tools and Materials You Actually Need
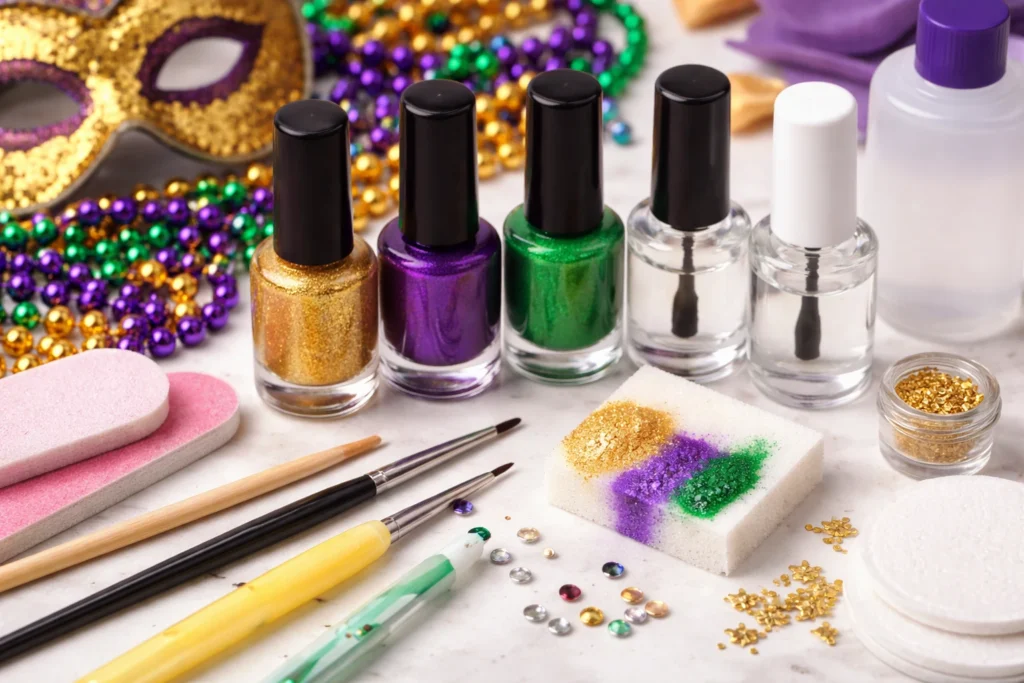
You can create strong results without a professional kit. Most easy DIY Mardi Gras nail designs at home rely on items you already own.
Nail Prep Essentials
- Nail file
- Buffer or soft file
- Cuticle pusher or wooden stick
Polish Basics
- Purple polish
- Green polish
- Gold polish or gold glitter
- Clear base coat
- Clear top coat
DIY Nail Art Substitutes
- Toothpicks for dots and details
- Bobby pins as dotting tools
- Makeup sponge for ombré effects
- Thin makeup or eyeliner brush for striping
Improvisation isn’t a compromise. It’s part of the process.
Nail Prep That Makes DIY Designs Last
Skipping prep is the fastest way to sabotage your work.
Start by cleaning nails thoroughly. Shape them evenly. Gently push back cuticles instead of cutting. Finish with a base coat to prevent staining and improve adhesion.
It takes five minutes.
It saves days of wear.
If you’re applying polish frequently, it’s also smart to stay informed about product safety. The U.S. Food and Drug Administration publishes guidance on cosmetic ingredients, labeling, and proper use. Reviewing the FDA’s cosmetics safety resources helps ensure that easy DIY Mardi Gras nail designs at home remain both festive and safe for repeated wear.
Easy DIY Mardi Gras Nail Designs You Can Do Right Now
These designs were chosen for one reason: they work in real life.
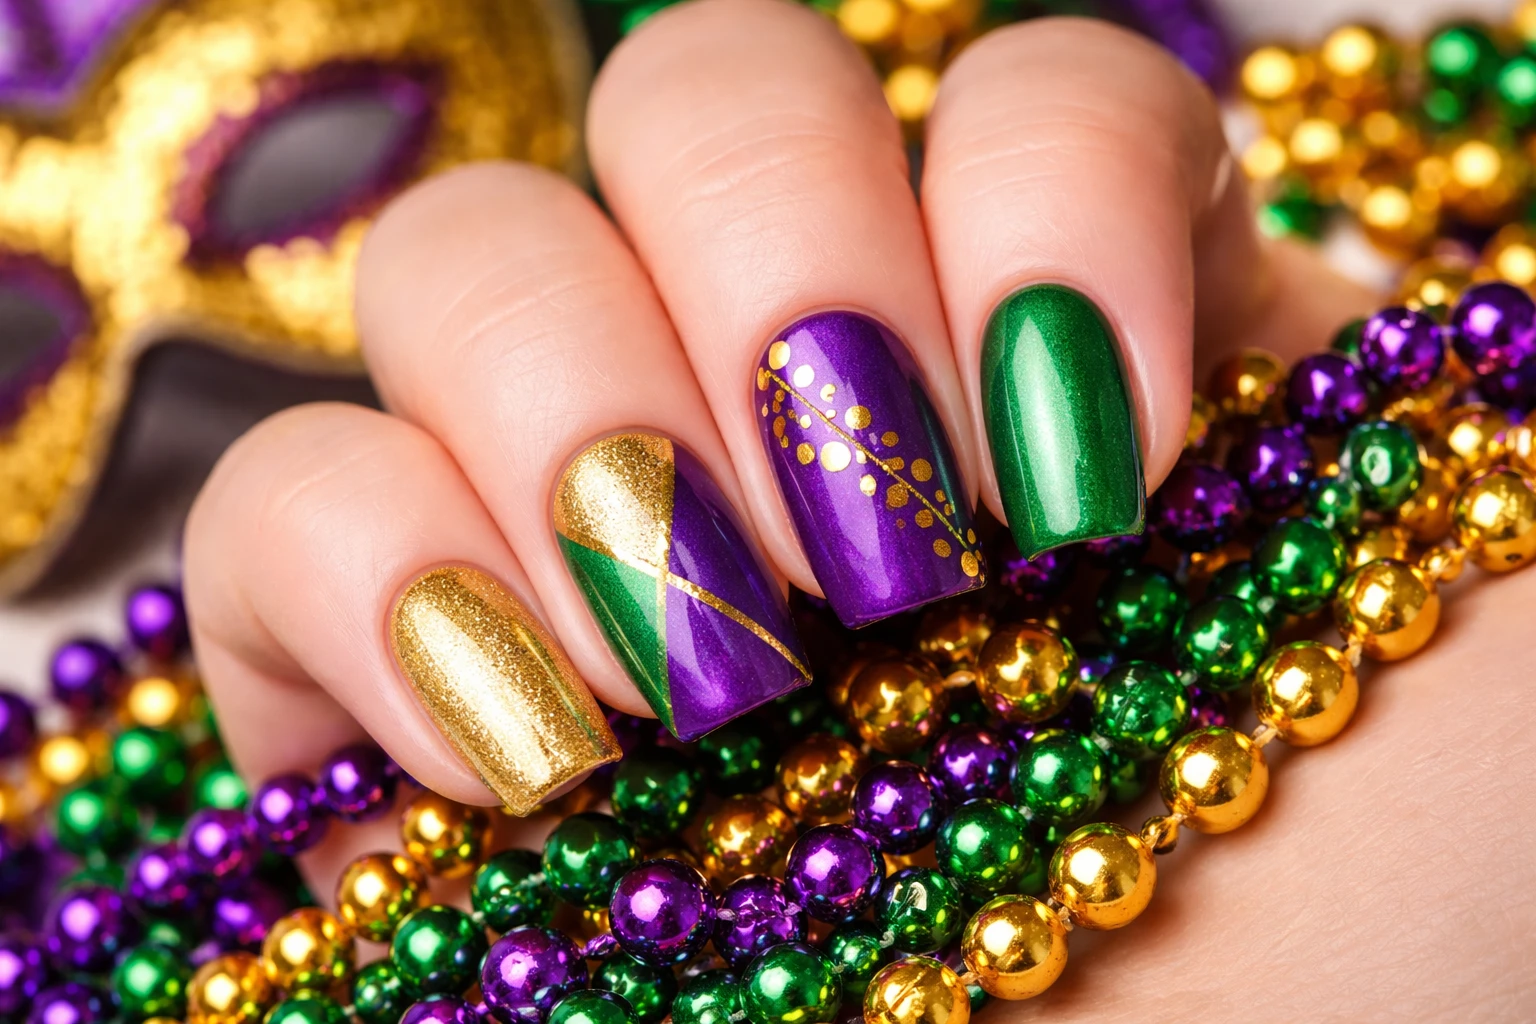
Color-Block Mardi Gras Nails
Paint half the nail purple and half green, or try diagonal blocks for movement. Keep edges clean by using the flat side of the brush, not the tip.
Best for short nails and beginners.
Gold Accent Nail
Paint all nails a solid color, then make one nail gold. This instantly elevates the look without increasing effort.
Gold glitter, metallic lacquer, or gold foil all work here.
This is one of the most reliable easy DIY Mardi Gras nail designs at home because it never looks overdone.
Sponge Ombre Nails
Ombre looks advanced but isn’t.
- Apply a light base color
- Dab purple, green, and gold onto a makeup sponge
- Press gently onto the nail
- Repeat until blended
Top coat smooths everything out.
Dotted Mardi Gras Nails
Dots are forgiving and fast. Use a toothpick or bobby pin to apply gold dots over purple or green bases. Try spacing them evenly or deliberately unevenly for a playful effect.
Simple Stripes
Vertical stripes elongate the nail. Horizontal stripes feel bold and graphic. One stripe per nail is often enough.
Neutral bases keep stripes looking intentional.
Minimal Mardi Gras Nail Designs for Everyday Wear
Not every celebration calls for full sparkle.
Subtle designs include:
- Nude base with a tiny gold dot near the cuticle
- Matte purple nails with one glossy gold accent
- Sheer pink with a thin green stripe
These styles transition easily from work to evening events.
Last-Minute Mardi Gras Nail Ideas
If time is tight, simplicity wins.
- Solid color + glitter top coat
- One accent nail only
- Press-on nails customized with gold polish
Fast doesn’t have to mean boring.
Common DIY Mistakes (and How to Avoid Them)
Even easy DIY Mardi Gras nail designs at home can fail if rushed.
Avoid:
- Thick polish layers
- Skipping dry time
- Overcrowding designs
Fixes:
- Thin layers dry faster and last longer
- Wait two minutes longer than you think
- Fewer details = cleaner results
How to Make DIY Mardi Gras Nails Last Longer
Longevity comes from habits, not polish brands.
- Seal the nail edge with top coat
- Avoid hot water immediately after painting
- Reapply top coat every two days
- Wear gloves for cleaning
These steps matter.
Matching Nails to Events and Outfits
Context shapes design choices.
- Parades allow bold colors and glitter
- Dinner events favor minimal accents
- Casual gatherings work with one festive detail
Let the occasion guide intensity.
Nail Shapes and Design Pairings
| Nail Shape | Best Design Types |
| Short | Color-block, dots |
| Square | Stripes, accents |
| Almond | Ombre, gradients |
| Coffin | Mixed designs |
Designs should complement shape, not fight it.
Removing DIY Nail Art Safely

Glitter removal doesn’t require scraping.
Soak cotton in remover, place on the nail, wrap with foil, and wait ten minutes. Gentle removal protects nail health.
Final Thoughts
Mardi Gras celebrates individuality, creativity, and joy. Your nails should reflect that.
When you choose easy DIY Mardi Gras nail designs at home, you’re not chasing perfection. You’re participating in the celebration in your own way through color, choice, and creativity.
Paint boldly.
Keep it simple.
And enjoy the process.
FAQs
Yes, most designs rely on basic techniques like color blocking, dots, or accent nails that beginners can do easily.
Purple, green, and gold are the traditional Mardi Gras colors and work well alone or in simple combinations.
No, common household items like toothpicks, bobby pins, and makeup sponges work just fine.
With proper prep and a good top coat, they can last 5–7 days without major chipping.
Absolutely short nails look great with color blocking, dots, and single accent nails.
A solid color manicure with one gold accent nail is the quickest and most reliable option.
Yes, gel polish works well as long as you cure each layer properly and keep designs simple.
Use a toothpick dipped in remover to clean edges before sealing everything with top coat.
Yes, subtle accents like gold dots or thin stripes still capture the Mardi Gras spirit.
You can safely do them 1–2 days in advance for the best appearance and wear time.