Fine-line detailing for spines isn’t loud. It doesn’t rely on glitter storms or heavy embellishment. Instead, it draws the eye with a whisper one deliberate stroke running like a backbone through the nail. And in today’s refined nail art landscape, that precision is everything.
If you’ve been around the evolving world of modern manicures, you’ve seen it. Clean vertical lines. Structured symmetry. Micro-details so sharp they look printed, not painted. Fine-line detailing for spines is having a serious moment because it balances restraint with impact. It’s minimal. But it commands attention.
Let’s break it down properly.
The Rise of Precision: Why Fine Lines Matter
Nail art has matured. We’ve moved from chunky florals and bold decals into something more architectural. More intentional. Clients now request designs that look tailored almost engineered. That’s where fine-line detailing for spines steps in.
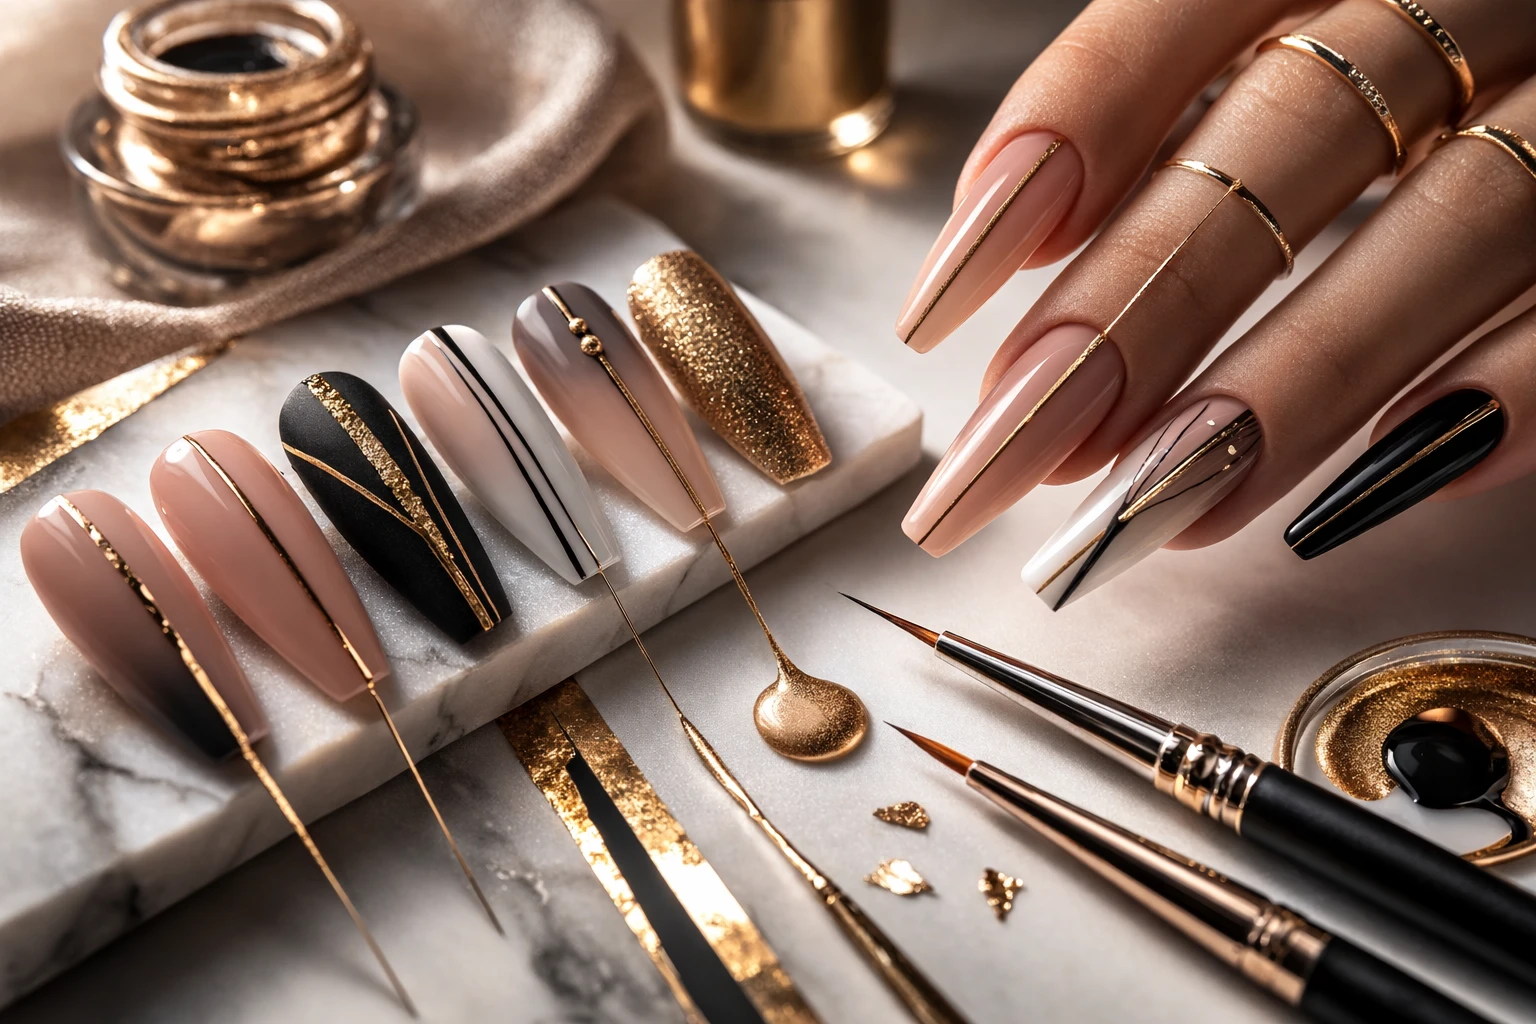
At its core, this technique centers on a primary structural line the “spine.” It runs vertically or diagonally, acting as the anchor for the entire design. Supporting micro-lines, dots, metallic traces, or subtle gradients build around it. But the spine remains the focal point.
Why does this work so well?
- It elongates the nail visually.
- It enhances symmetry.
- It adds sophistication without clutter.
- It photographs beautifully.
And in a world where hands are constantly on camera typing, holding coffee cups, scrolling precision reads as premium.
What Exactly Is Fine-Line Detailing for Spines?
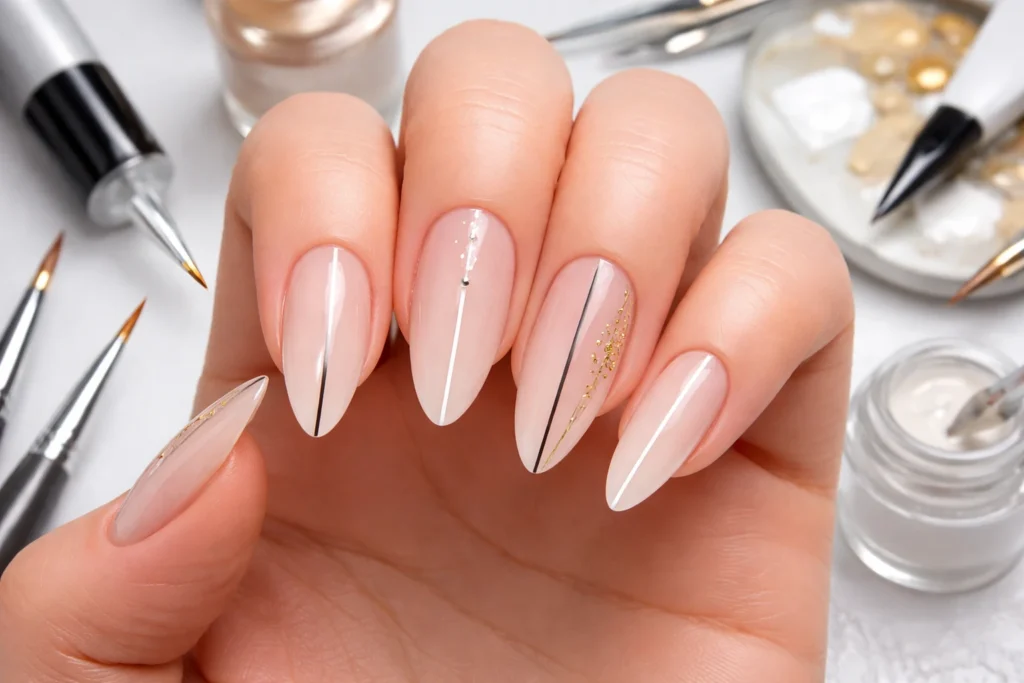
Let’s define it clearly. Fine-line detailing for spines is a nail art technique that uses ultra-thin, controlled strokes to create a central structured line (the spine), often supported by complementary micro-details. The design relies on precision rather than volume.
It’s not striping tape slapped down quickly.
It’s not thick graphic blocking.
It’s control.
Think of it as architectural drafting but on a nail plate.
Interestingly, this emphasis on structure echoes principles found in advanced geometry and visual mathematics, such as projective geometry, which studies alignment and perspective relationships in space. If you’re curious about the theoretical backbone behind visual structure, you can explore the concept. While that may sound academic, the connection is simple: alignment creates harmony. And harmony reads as beauty.
Tools & Materials: Precision Starts Here
Let’s get practical. Fine-line detailing for spines lives or dies by the tools you use.
Below is a quick breakdown of essentials:
| Tool | Why It Matters | Pro Tip |
| Ultra-fine liner brush (5–10mm bristles) | Controls micro strokes | Trim stray bristles before first use |
| High-pigment gel polish | Delivers opaque lines in one pass | Avoid watery formulas |
| Nail art palette | Keeps product thin and workable | Spread gel thin to prevent pooling |
| LED/UV lamp | Cures without smudging | Flash cure after each line |
| Clean-up brush + acetone | Corrects micro mistakes | Use minimal product |
Product Safety Matters
As professionals, it’s important to use products that meet proper safety standards. Nail products fall under cosmetic regulations in the United States. For current ingredient and safety guidance, review the U.S. Food & Drug Administration’s cosmetic overview.
Using regulated products protects both your clients and your reputation especially when working with highly pigmented gels required for fine-line detailing for spines.
Preparing the Canvas: Don’t Skip This
I’ve seen talented artists ruin otherwise flawless fine-line detailing for spines because they rushed prep. Don’t. Precision design demands a perfect base.
Step 1: Shape Intentionally
Almond and coffin shapes amplify vertical spines. Short square nails can still work but keep the spine centered to avoid visual imbalance.
Step 2: Cuticle Work
Any leftover cuticle will interrupt your line. Remove carefully and clean thoroughly.
Step 3: Smooth Surface
Buff lightly. Dust off completely. Apply base coat evenly. If the surface isn’t glass-smooth, your fine line will skip. And once it skips, you’re fighting uphill.
The Technique: Executing Fine-Line Detailing for Spines
Now we get into the real work.
1. Map the Center
Before applying product, visually identify the true center of the nail. Not what looks centered at first glance but the structural center. Hold the finger upright at eye level. Rotate slightly. Watch the light reflection. It reveals asymmetry instantly.
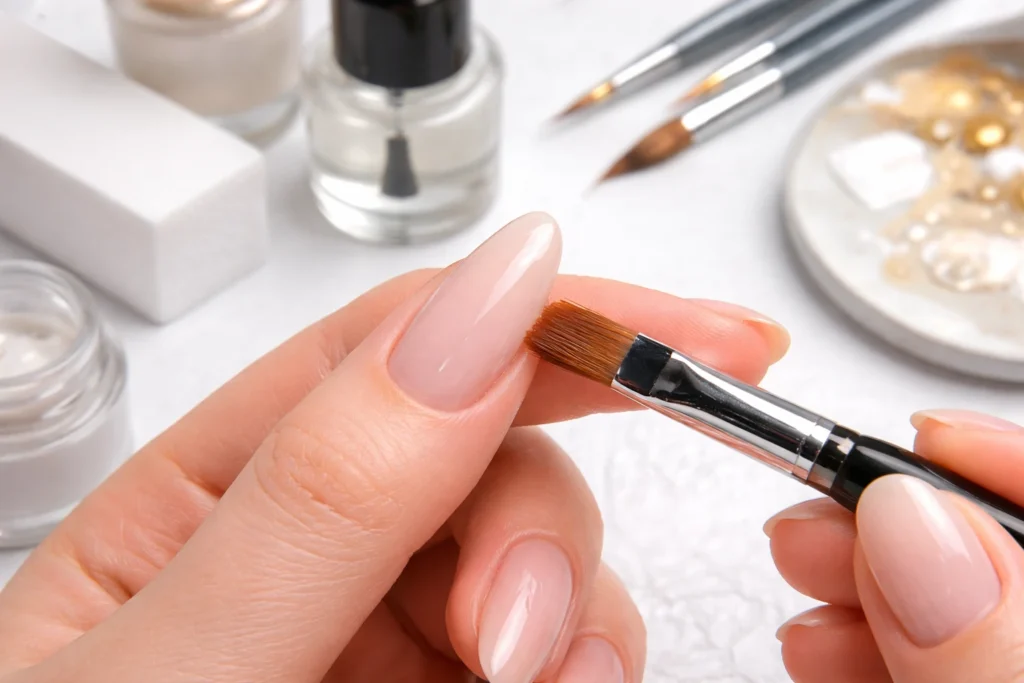
2. Load the Brush Correctly
Too much gel? The line thickens.
Too little? It breaks mid-stroke.
Roll the brush gently in product. Then refine the tip on your palette. You want precision, not pooling.
3. The Pull Technique
Instead of dragging from cuticle to tip in one aggressive stroke, try this:
- Place the brush gently at the starting point.
- Lightly pull toward yourself.
- Maintain consistent pressure.
- Lift cleanly at the end.
Breathe. Steady breathing reduces hand tremor. Fine-line detailing for spines isn’t rushed. It’s executed.
4. Flash Cure
Once your spine is placed, flash cure immediately. This locks the structure before you add micro accents.
Adding Supporting Details Without Overcrowding
The spine is the hero. Supporting elements should feel intentional.
Consider:
- Micro dots aligned symmetrically.
- Ultra-thin intersecting horizontal lines.
- Metallic foil fragments along one edge.
- Negative space accents.
Less is stronger here.
When clients ask for “just one more detail,” I gently guide them back to structure. Fine-line detailing for spines thrives on restraint.
Creating Dimensional Effects
Flat precision is beautiful. But sometimes you want depth.
If you want to elevate your design, combine fine-line detailing for spines with Gel layering for depth, encapsulating the spine beneath a thin layer of clear builder gel to create a suspended effect. That separation adds dimension without visual heaviness.
It’s subtle. But powerful.
Advanced Design Variations
Once you’ve mastered a simple vertical spine, expand.
Minimalist Gold Spine
Nude base. Razor-thin metallic gold line. Gloss finish. That’s it. Luxury lives in simplicity.
Split Spine with Negative Space
Two parallel micro-lines down the center. Transparent gap between them. The elongation effect is immediate.
Geometric Spine Framework
Add delicate perpendicular lines at measured intervals. Think structure not chaos.
Ombre Background + Crisp Spine
Soft gradient. Sharp contrasting spine. Contrast creates drama without clutter. Fine-line detailing for spines adapts effortlessly to seasonal palettes while maintaining its core identity.
Common Mistakes (And Fixes)
Even experienced artists make these errors.
Wobbly Lines
Cause: Hand instability.
Fix: Anchor your pinky on the client’s hand.
Thick Midpoints
Cause: Inconsistent pressure.
Fix: Practice straight-line drills daily.
Bleeding Lines
Cause: Too much product or uncured base.
Fix: Thin layers. Cure thoroughly.
Crooked Spine
Cause: Visual misjudgment.
Fix: Use a faint pencil guideline over a matte cured base. Fine-line detailing for spines requires discipline. But the payoff? Clean, confident execution.
Professional Habits That Elevate Your Precision
Skill compounds.
- Practice 20 straight strokes daily.
- Replace liner brushes regularly.
- Use magnification when needed.
- Photograph every set for critique.
I zoom in aggressively on my own work. It’s not always flattering. But it builds precision fast.
Maintaining Fine-Line Nail Art
Clients ask this often: how long does fine-line detailing for spines last? With proper sealing and care, 2–3 weeks is realistic.
Advise clients:
- Wear gloves for cleaning.
- Apply cuticle oil daily.
- Avoid picking or scraping.
Top coat application matters. Float it. Don’t drag. Seal gently. Cure thoroughly.
Why Clients Love Structured Spine Designs
There’s psychology behind it. Humans are naturally drawn to alignment and symmetry. Structured vertical lines feel stable and composed. Fine-line detailing for spines signals intention. Control. Taste. In corporate settings, it feels polished. At events, it feels refined. On camera, it looks sharp.
It’s versatile without being generic.
A Weekly Skill-Building Framework

Want to master it faster?
Day 1–2:
20 straight vertical lines on practice tips.
Day 3:
Center spines on five different nail shapes.
Day 4:
Add symmetrical micro accents.
Day 5:
Introduce metallic detail.
Day 6:
Time yourself while maintaining accuracy.
Day 7:
Photograph. Review. Improve.
Precision grows with repetition.
Final Thoughts: One Perfect Line Changes Everything
Fine-line detailing for spines isn’t flashy. It doesn’t compete for attention. It commands it quietly. Mastering it sharpens your control. Refines your eye. Elevates your portfolio. It’s not just a design technique. It’s a discipline. And once you truly master fine-line detailing for spines, your work carries a different energy cleaner, sharper, more intentional. That’s the power of one perfect line.
FAQs
It’s a precision technique that uses ultra-thin lines to create a central “spine” design that structures the entire nail look.
Yes, especially when the spine is centered, as it can visually elongate shorter nail shapes.
An ultra-fine liner brush with long, flexible bristles gives the best control and clean strokes.
Gel polish is preferred because it offers better control, higher pigment, and the ability to cure between steps.
Anchor your hand for stability and use slow, controlled strokes while maintaining steady pressure.
With proper sealing and care, it can last 2–3 weeks without losing sharpness.
Yes, but it requires consistent practice to build steady hand control and precision.
Applying too much product, which causes thick or uneven lines.
Absolutely fine-line detailing for spines pairs beautifully with ombre, metallic accents, and subtle embellishments.
You can encapsulate the spine with clear builder gel to create depth without adding bulk.